Tuesday, August 11, 2015

Overnight Chia Pudding

the-word-chia-spelled-with-chia-seeds

When added to liquid, dry chia seeds immediately begin to form a hydrogel capsule, absorbing up to 27 times their weight in water. When mixed with unsweetened almond or coconut milk, it's pudding with a consistency similar to tapioca!

Chia seeds are extremely beneficial for your health for many reasons like the high content of fiber & healthy omega-3 fats. They keep you fuller, longer and give tons of energy!

Vanilla chia seed pudding:

Ingredients
  • 1 cup unsweetened vanilla almond milk
  • 3 Tablespoons chia seeds
  • 1 teaspoon pure vanilla (optional)
  • 1 packet stevia (optional)
Directions
Mix almond milk and chia seeds together.
After a few minutes stir again.
Cover and put in the fridge overnight.
When ready to eat, add vanilla extract & stevia.

Chocolate Chia Seed Pudding

Ingredients
  • 1 1/2 cups unsweetened almond milk
  • 1/3 cup chia seeds
  • 1/4 cup cacao or unsweetened coco powder
  • 2-5 Tablespoons pure maple syrup
  • 1/2 teaspoon ground cinnamon (optional)
  • 1/4 teaspoon sea salt
  • 1/2 teaspoon vanilla (optional)
Directions
Add all ingredients except sweetener to a mixing bowl and whisk vigorously to combine. If not blending (which I preferred!), sweeten to taste with maple syrup at this time. If blending, you can sweeten later with maple syrup or dates.
Let rest covered in the fridge overnight or at least 3-5 hours (or until it's achieved a pudding-like consistency).
If blending, add to a blender and blend until completely smooth and creamy, scraping down sides as needed. Sweeten to taste.
Leftovers keep covered in the fridge for 2-3 days, though best when fresh.
Serve chilled with desired toppings, such as fruit, granola or coconut whipped cream.
Do you have a favorite chia seed pudding recipe?

Tuesday, July 28, 2015

Chicken with Southwestern Salsa

11751942_935102946551726_5049662097880197627_n


Ingredients
1 tablespoon canola oil, divided
1 teaspoon ground cumin, divided
3/4 teaspoon ground coriander, divided
1/2 teaspoon salt
1/4 teaspoon black pepper
1/8 teaspoon ground red pepper
4 (6-ounce) skinless, boneless chicken breast halves
1/2 cup chopped onion
1 teaspoon bottled minced garlic
1/3 cup chopped plum tomato
1/4 cup chopped fresh cilantro
2 tablespoons fresh lime juice
1 (15 1/2-ounce) can black beans, rinsed and drained
1 (8 3/4-ounce) can no-salt-added whole kernel corn, drained


Directions
1. Heat 2 teaspoons oil in a large nonstick skillet over medium-high heat. Combine 1/2 teaspoon cumin, 1/2 teaspoon coriander, salt, black pepper, and red pepper; sprinkle mixture evenly over chicken. Add chicken to pan; cook 7 minutes on each side or until done.
2. While chicken cooks, heat the remaining 1 teaspoon oil in a small skillet over medium-high heat. Add onion to pan; sauté 1 minute. Add garlic to pan; sauté 30 seconds. Transfer onion mixture to a large bowl; add remaining 1/2 teaspoon cumin, remaining 1/4 teaspoon coriander, tomato, and remaining ingredients to onion mixture, tossing well. Serve with chicken.

Thursday, July 23, 2015

8 Yoga Moves to Strengthen Your Knees

Do you have bad knees like I do? Then check out these 8 simple yoga moves to strengthen them.

Yoga can be daunting for those with knee problems. Unfortunately, that’s a lot of us, myself included. Below are the yoga poses I used to strengthen my knee after surgery.

Three years into my yoga career, I suffered a meniscus tear. Physical therapy, ice, and painkillers were not enough to ward off surgery. I had to go under the knife.

My bones and tendons blocked the doctors from seeing the exact location of the tear in ultrasounds, so exploratory surgery had to be performed before the surgeon could fix the problem. By the time they were done, my leg looked like it had been beaten with a meat tenderizer and my muscles and soft tissue were in a sorry state. Giving up my career as a yoga instructor was not an option for me, so I took the time to learn how to protect my knee by strengthening the muscles that support it.

Here are the exact poses I practiced to strengthen and stretch my knees. However, make sure to always seek advice from your physician before beginning any exercise or rehabilitation regimen, especially if you have any unique or special medical conditions, such as knee problems.

5 Knee-Strengthening Poses:

Supported Chair Pose (Utkatasana)
This pose will strengthen the quadriceps, hamstrings, and abductors. It also increases blood flow to the lower region of the body, which can help with fluidity of movement. Chair pose is typically practiced away from the wall, but that may require more strength than your knees are able to handle at the moment, so use the support of a wall if you need it. Place your feet hip distance apart. Lean your back up against a wall and slide down until your knees and ankles are parallel with each other. You can place your hands on your thighs or reach the arms towards the ceiling. Hold the pose for a few breaths then slide back up. Repeat several times. As your legs get stronger, increase the number of breaths you hold the pose.
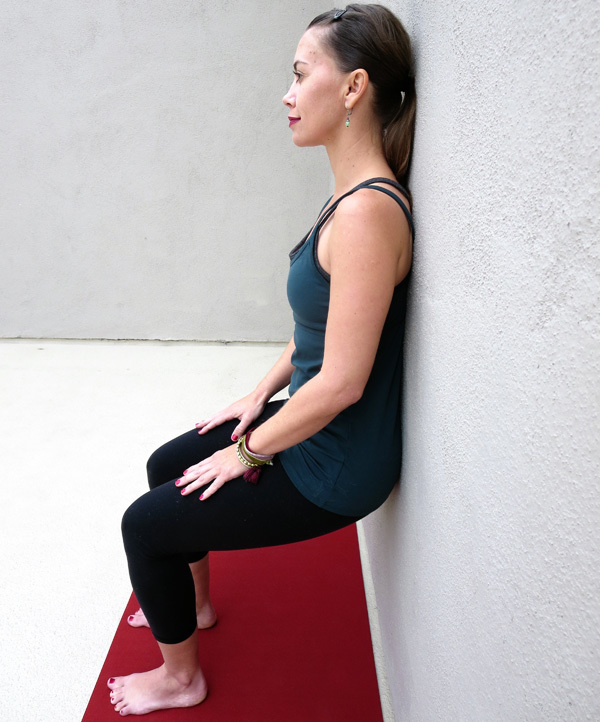
Yoga for the Knees Chair Pose

Supported Bridge Pose (Setu Bandasana)
Bridge pose is a yoga asana that helps properly align your knees while strengthening your back, glutes, and hamstrings. Lie flat on your back with your knees bent and walk your feet towards your bottom until you can just touch your heels with your fingertips. Step your feet out hip distance apart and place a block horizontally on the floor between your feet. This will help keep everything in place. Press into all four corners of the feet, the inside and outside edges as well as the heel and the balls. Draw your navel in toward your spine and press your lower back into the ground. Tuck your tailbone in and lift your bottom from the ground. Lift as high as you can without compromising your form (your knees should remain hip distance apart and parallel with the ankles). To get an added stretch in the chest, you can roll your shoulders under your body and interlace your fingers underneath you. Hold this pose for a few breaths then release the upper back first, then mid back, then finally lower your lower back and tailbone to the floor. Repeat a few times.
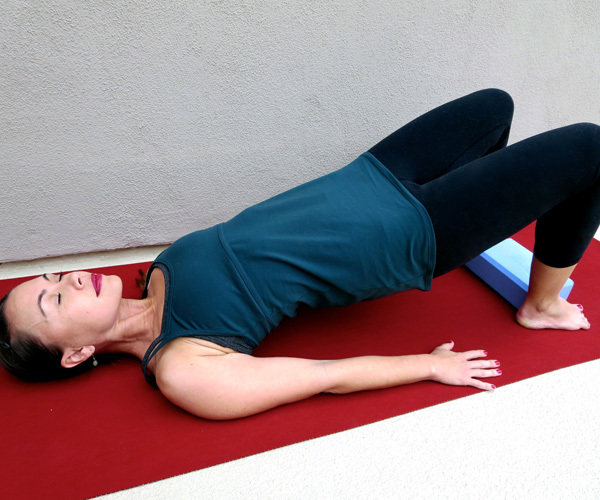
Yoga for the Knees Bridge Pose

Supported Half Moon Pose (Ardha Chandrasana)
Balancing poses can be very beneficial when it comes to building the muscles that help the knee. However, if your knee is currently inflamed, you want to avoid anything that will put this much weight on the joint. By using the support of a block, you can work on strengthening the muscles in this pose and stretching the hamstrings without putting stress on your knee. The first time you do this pose, use an empty wall and a block for support. Stand with your back to the wall and rotate your right foot so that the outside edge of the foot is parallel with the wall. Place the block in your right hand, bend your right knee, and shift your weight so you’re balancing on the right leg. Set the block on the floor a few inches in front of your right foot and press your right hand into it to help straight the right arm and leg. Rotate the left side of your body upward so that your back is either in alignment with the wall behind you or leaning on it. Your left leg should be lifted and parallel with the floor. Your left arm should create a straight line with the right arm. Hold for a few breaths and increase the amount of breaths as you get stronger.
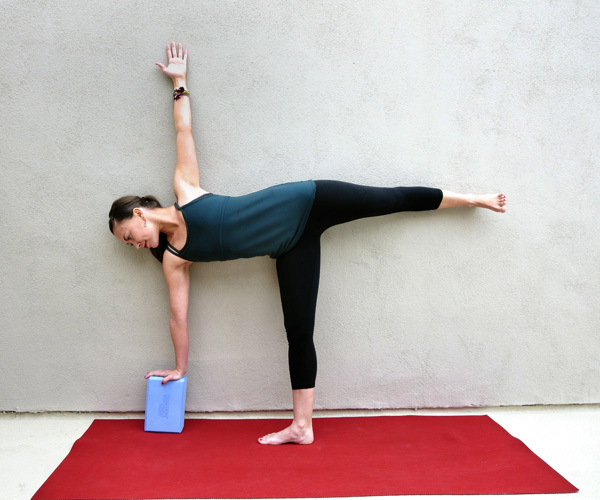
Yoga for the Knees Half Moon Pose

Mountain Pose (Tadasana)
Tadasana will teach you proper alignment that may help ward off new knee injuries and help you become aware of the muscles you need to engage to protect the knee. To get into the pose, stand with your feet hip distance apart, lift all your toes up, spread them wide, and then rest them back down on the floor. Press into the floor with all four corners of the feet to evenly distribute the weight of the body. As you press into your feet, engage your calf muscles. Engage the quadriceps and internally rotate your inner thighs to widen your sits bones. Tuck your tailbone in, and engage the glutes. Tighten your abs. Pull your shoulders back and down. Make sure your shoulders are stacked over your hips and ankles. Lift your chin and pull it back slightly so it is parallel with the floor. Relax the muscles in your face. Take several deep breaths and notice the muscles you have engaged to create proper posture. Hold this pose for approximately 10 breaths.
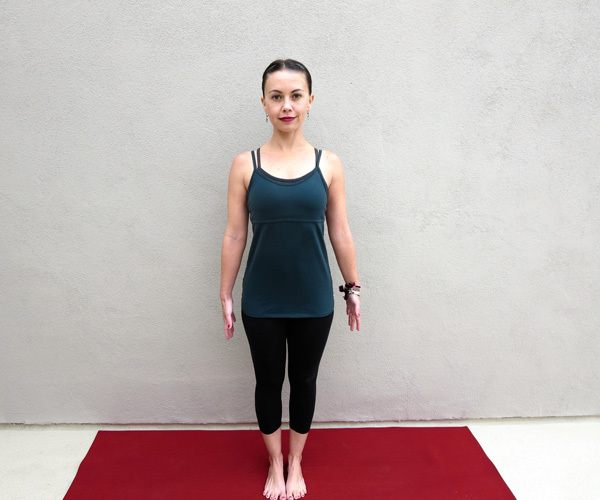
Yoga for the Knees Mountain Pose

Triangle Pose (Trikonasana)
A common problem with those who suffer with knee injuries or weakness is a strong vastus lateralis (the outer part of your quadriceps) and a much weaker, underused vastus medialis (the inner part of your quadriceps). Trikonasana is a pose that will strengthen the muscles that support the inner quad. Step your feet out in a wide stance so your left foot is parallel with the back of your mat and your right foot is turned out at a 90 degree angle, parallel with the inside horizontal edge of the mat. Bend your right knee so it lines up with the ankle and hip. Press into both feet and straighten the right leg, engaging the inner part of your quad and thigh. When this muscle is engaged, you will notice it is impossible to lock your knee. However, when you disengage the muscle, it will hyperextend and lock (you should avoid this). Reach your right arm straight down and rotate upward with the left side of your body. Line up your arms so they’re in a straight line and keep your core engaged. For support, you can place your right hand on a block, but be sure to keep the core engaged as you reach up to the sky with the left side of your body. Hold for a few breaths, disengage, and then repeat.
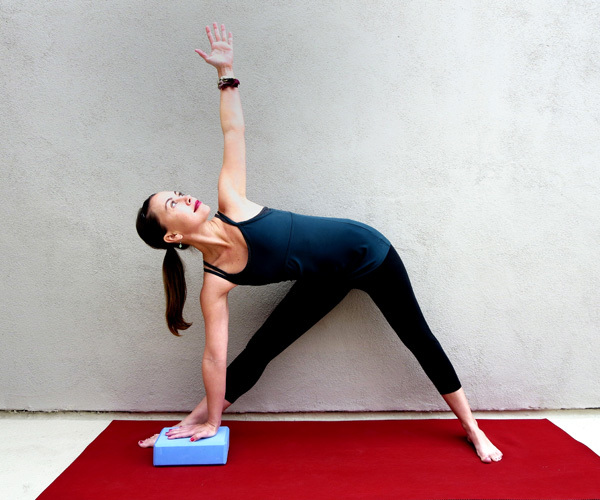
Yoga for the Knees Triangle Pose

3 Knee Stretching Poses:
It’s important to not only strengthen the knees but also to stretch them. You can make knee injuries worse if the muscles are so tight that they decrease movement fluidity. Here are 3 poses that stretch the knees and the supporting muscles without causing pain. Again keep in mind that each person is different and very few injuries are exactly the same, so make sure to seek advice from your physician before beginning.

Wide-Angled Seated Forward Bend (Upavistha Konasana)
Many of the poses that stretch your legs and hips tend to torque the knee in a way that can be quite painful for those who have knee weakness and pain. Konasana is a great pose that will stretch out the whole back of the body as well as the hips, inner thighs, and groin. To get into this pose, straddle your legs out in the widest stance you can comfortably place them. Flex your feet to activate the leg muscles. Place your hands on the ground forward in front of you and slowly walk them forward until you feel the stretch. Keep your spine straight and elongated throughout the stretch. If you find that you spine creates a C shape when you start to fold, place a blanket under the sits bones to lift yourself slightly off the floor. Hold this pose for 8 to 10 breaths. Follow it up by pulling the legs together and the knees into the chest.
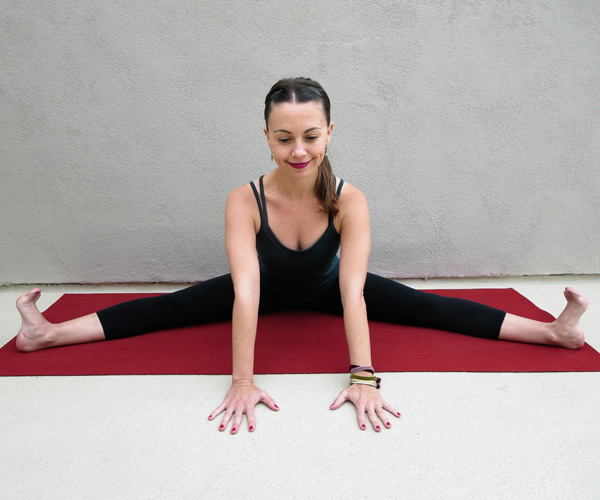
Yoga for the Knees Seated Wide Angle Forward Bend

Easy Pose (Sukhasana)
Lotus is a common pose that that is held at the beginning and end of each yoga class and can be a real pain in the knee. So, instead of sitting with both feet in the crooks of your thighs, simply cross your legs and gently place one in front of the other. Keep in mind that the deeper the bend in the knee the higher the chance of pain, so you may not have a perfect crossed leg look. That’s okay. You also have the option of sitting on a blanket to make the pose more comfortable and placing blocks on either side of the knees. This pose will stretch your knees and ankles. Sit up tall and breathe deeply for about 8 to 10 breaths, increasing the amount of breaths as you feel more flexible over time.
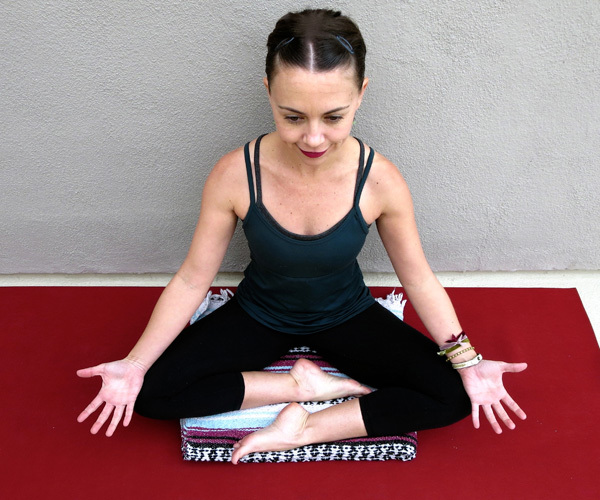
Yoga for the Knees easy pose

Child’s Pose (Balasana)
This is a gentle knee stretch that can be intensified the closer you can move your bottom toward your heels. Props are necessary for those with tight, sore knees. Start on your hands and knees (with a blanket under the knees for protection). In the full, unmodified, pose you’d have your feet together with your toes untucked, knees separated so the belly can rest between the thighs, bottom sitting on the heels, and forehead on the mat with the arms extended out. Modify as you need. Consider decreasing the degree to which you part your knees. Use blankets behind the knees or on the heels. This pose can be held for 8 to 10 breaths and then increased slowly as you become more flexible.
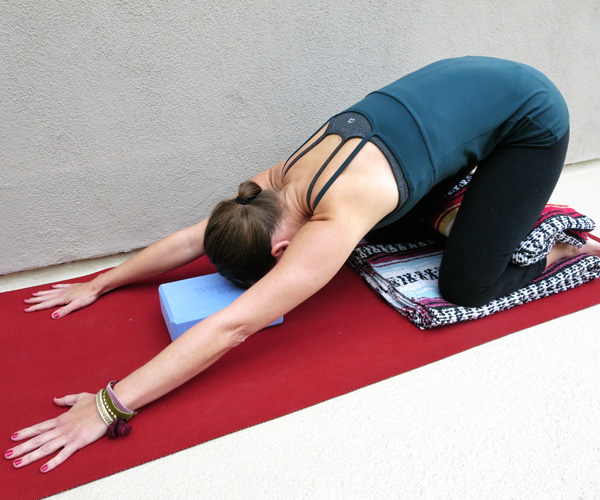
Yoga for the Knees Childs Pose

Source: http://www.beachbody.com/beachbodyblog/fitness/8-yoga-moves-to-strengthen-knees?code=SOCIAL_BB_BLOG&code=sf11278276

Tuesday, June 23, 2015

Chocolate Almond (Peanut) Butter Bites

 
I found this recipe on healthyalamode.com's website
Want a Reese's PB Cups without the guilt? This batch of heaven is made with Shakeology!

Ingredients
  • 4 tbs. coconut oil
  • 8 tbs. chocolate shakeology [or vegan chocolate shakeology]
  • 4 tbs. almond butter [or PB2 mixed with water]
Directions
  1. In a small microwavable bowl, add half of the coconut oil [2 tbs.] and melt in the microwave, approximately 30 seconds. Add in half of the chocolate shakeology [4 tbs.] and stir until well mixed.
  2. Divide the mixture equally into the bottom of silicone molds or a mini muffin pan and place in the freezer for about 5 minutes while preparing the second batch.
  3. Take the mold or muffin pan out of the freezer and spoon in about 1 tsp. of almond butter.
  4. Layer on the second batch of coconut oil/shakeology mixture to completely cover the almond butter.
  5. Put the mold back in the freezer for at least another 5-10 minutes.
Notes
For best results, keep your Chocolate Almond Butter Bites in the fridge to keep them nice and cold! Personally I love them frozen!

Sunday, June 7, 2015

Homemade Chocolate Bars

I found this recipe at kitchenstewardship.com

These easy chocolate bars can be customized to make a variety of flavors.

Ingredients
  • ½ c. room temperature coconut oil
  • ½ c. cocoa, cacao or carob powder
  • ⅓ c. raw honey
Instructions
  1. Blend all the ingredients together in a food processor until smooth. Be sure that the coconut oil isn't melted or the honey will sink to the bottom. You can increase the honey by a few tablespoons if you like your chocolate really sweet.
  2. Mix in any add in ingredients. Some do well processed right in the food processor, others you'll want to stir in with a spoon or sprinkle on top after pouring.
  3. Pour into a mold or spoon dollops onto a parchment lined cookie sheet. Your servings yield will depend on what mold you use or the size of dollops.
  4. Chill or freeze until completely solid, about 20-30 minutes.
  5. Store in the fridge or freezer.
Serves: 4-8
 
Notes
* Unrefined coconut oil can be used, or refined if you don't want to taste the coconut so much.

Wednesday, June 3, 2015

Grilled Honey Mustard Chicken

I found this recipe on Simply Scratch and it looks amazing! I have copied their post below or find them here!

I’ve got two words for ya: Honey. Mustard.

But not just any mustard. Don’t be confused… not all mustards should be considered equal. You wanna use good mustard, and definitely not the yellow kind ya schmear on a burger bun or zig-zag over a hot dog. I mean whole grain, stone ground, natural mustard. Mmm MMM! I love this stuff! Whoever decided to pair it with honey is just plain genius. And I love you.

5598981077_7bd831d03b_o

I have made this recipe a dozen times; whether a quick marinade then on the grill, marinade for a few hours then sear on a grill pan or in the oven… and every single time I make it I wonder how it could possibly be so dang good? This is my no fail, always-a-hit-and-guaranteed-to-turn-out-delicious-every-time recipe!
Having company over? …How about grilled honey mustard chicken for dinner.
Want a quick dinner? …Whip up some Honey Mustard chicken.
Not sure what to make for dinner? …You’re Welcome!


To make the marinade/sauce you will need: Honey, whole grain mustard (hot beer mustard, if you can find it, is reeeeal good!), cayenne pepper, paprika, red chili flakes, garlic, kosher salt and the juice of half a lemon.


Smash…


…and mince a large clove of garlic.


Add your garlic, red pepper flakes, cayenne pepper, paprika and kosher salt. Please don’t be worried about the spices, this chicken is NOT spicy. It just gives it great flavor!


Add the honey to the mustard. Let me just tell you… there is no way to make mustard look yummy… well not in this picture at least… egad!


Put the squeeze on half a lemon, directly into the bowl, you also could do it over a small mesh strainer to catch the seeds, but I’m a rebel.


Give it a good whisk, until everything is combined. Go ahead and taste it… it’s pretty yummy… but you want to make sure that you can clearly taste the honey and mustard… equally.


Reserve about 4 tablespoons of the honey-mustard mixture {one tablespoon for each chicken breast} off to the side; you’ll need it at the end.


Then pour the remaining marinade over the chicken…


Toss and cover with plastic wrap, leave on the counter {at room temp) for about and 30 to 45 minutes. You never ever put cold chicken, or any meat for that matter, on a hot grill! It’s bad news!


Grill on medium/medium high for about 6 to 7 minutes per side or until chicken is done. Which means not pink, but NOT dry either!


Let rest for about 5 minutes before serving, so the juices redistribute.


But! While it’s resting… pour a tablespoon of the reserved sauce over the top of each chicken breast… ohhhhh yeah!


Ssssaucy!
Just like a car, I feel you should look at this from all angles, no?


Here we have the “front end”, nice char… with lots of crispy goodness.


…and then the top view, with just the perfect amount of sauce, wouldn’t you say?


Serve. Enjoy. Period.

Print Save

Grilled Honey Mustard Chicken

Yield: 4 servings

Ingredients:

1/2 cup of any Whole Grain Mustard
1/2 cup of Honey
Juice of 1/2 a Lemon
1 Garlic Clove, smashed and minced
1/2 teaspoon Paprika
1/2 teaspoon Kosher Salt
1/4 teaspoon Cayenne Pepper
1/4 teaspoon Red Pepper Flakes
4 Boneless Skinless Chicken Breasts

Directions:

Whisk all ingredients in a small bowl.
Reserve 4 tablespoons of sauce and then pour the rest over the chicken, toss and cover with plastic wrap and let it sit for about 30-45 minutes at room temp.
Preheat the grill on medium- medium high heat, grill chicken for about 6 to 7 minutes per side or until chicken is done.
Pour the reserved 4 tablespoons of honey-mustard sauce over chicken and let rest under foil for about 5 minutes.
Serve.

Thursday, April 2, 2015

Discovering your kids potential


Do you live through your kids? Or better yet, do you push your kids to be the type of kid/ person you want them to be? Make then participate in the sports you wish you had gotten to try? Engage them in classes and activities to develop talents that you wish you had or had at least been given the opportunity to see if that talent was inside you? I don’t recall feeling this way, or even pushing my older kids into activities, events, social groups or settings that I thought they should be in, but then again that was soooo many years ago, maybe I did and that memory is now gone?!


As my little Turkey gets older day by day and her little personality starts to take shape we have been making a list of the things we would like her to do and be a part of. Dance class because she likes to shake it, tumbling or some sort of class because she loves to get out my exercise mat and workout, maybe a baby yoga diva??? Of course hubby instantly wants her in t-ball, softball, and earning college scholarships playing softball - UMMM NO! Okay I will consider it if SHE really wants to do it!

But it isn’t our job as parents to decide what our kids get to be or become…it is however our job to recognize, direct, and encourage our kids to grow and develop their gifts, skills, and talents to become…a better version of themselves! Does this mean throw them into every class? Sign them up to play every sport? Invest in every instrument?  Well we could but let’s be honest, that would not only burn them out but you have to DRIVE them to everything, support them, pay for it, encourage it, attend the recitals, shows, games…yea this list goes on and on and on! Are you tired yet??? 

“In order to help them (our children) grow and mature to THEIR fullest potential, we must get to know our children, understand them, and recognize their strengths and weaknesses. We must help them discover their unique bents.”   But how exactly are we going to succeed in helping them reach their direction in life?


We start by SEEING THE POTENTIAL! Begin by writing down the potential you see in your child(ren) in these four areas of growth:

1. Mental
2. Physical
3. Spiritual
4. Social

Note the qualities, interests, and/ or aptitudes you see. Share this list with others and especially your child(ren), help them chose and decide what they need to develop these potentials. Always….ALWAYS, be observing and adding to this list!

Together with your child, if they are of age to be able to express their desires and suggestions, OFFER OPPORTUNITIES OF GROWTH! Let them try a variety of things they like, this doesn’t mean bombard them with that heavy schedule of school and activities, but allow them to test different areas of interests. Sometimes this could be as simple as interacting and involving them in activities at home. Do they show a desire to draw? Then grab a handful of paper, some pens, pencils, crayons, markers (you get the idea). Our older gals for about 2 years got tons of art stuff, because it seemed like they were both doodling non-stop and even more-so when they were together. Their room has easels, canvases of all different sizes, pencils, drawing paper of various sizes, tracing paper, every paint color and type you can imagine and twice as many brushes. But the funny thing is, neither of them LOVE it so much they want to make art part of their everyday life…nope it is true, to them this is their way to relax, unwind, share some quality time together and hide away from the world for hours when they want to be left alone! 

Please, please, please, don’t get caught up on the thought that if you don’t put them in every class, every sport, every THING, they will miss out, not become the superstar you think they are who think they could be. We have all heard it, that one child who  doesn’t want to be there, whining constantly that they want to go home, acting out to try to make their point, yet are forced to stay and are miserable.

Now they have found what they want to do, what they excel in….or have the desire to put 100% of their all into something, something THEY have chosen…now what? Have THEM set goals, goals of what they want to accomplish, where they want to go. Encourage THEM to write out realistic and obtainable goals and then encourage them to develop strategies on how they can reach their goals. Have them share and revisit their goals often, because just like you, their goals/ dreams/ desires may change! 


Have any additional thoughts to share, ideas, or other suggestions regarding this topic? If so please comment below!

Wednesday, March 25, 2015

Erasing Negativity

Did you know it takes at least 10 (yep ten) positives comments to overcome the effects of a negative one (one…ONE…1) TEN to ONE


How many negative comments do you hear a day?

Now…how many negative comments do your kids hear?

It is so easy for any child to become the target of cruel and negative comments and those words and comments are coming at them faster and in different forms than from years ago. Oh thanks technology! Sadly even the simplest nickname could be a negative comment to a child, I know I have a kid with the nickname Turkey! We are working on changing that, currently that nickname is only being used in the social media world…

So is it our job to build up our children’s strengths and put regular deposits in their emotional tank to counteract these negative comments? Oh I really hope you just answered YES! While a child’s self-worth shouldn’t be strictly dependent on the affirmation we give them. We affirm our kids (and others) because our encouragement can provide them with the strength they need to become their full potential.

Encourage means ‘to put courage into, to give strength.’

Are we giving strength and courage to our children each day? Several times a day? Each hour? To help them face life’s opportunities and challenges? Remember TEN to ONE!

Are we able to identify our children’s talents, qualities, abilities? Are we verbally recognizing them? Building them up verbally, emotionally, physically so they can reach for their highest potential? But how do we do this? Or improve on this?

1. PAY ATTENTION!!! Yep put down and away those electronic devices, YOU ARE MISSING YOUR CHILDS CHILDHOOD! Now pay attention to what their interests are, watch them and verbally admire their skills!

To be a positive mom, we need to spend a reasonable QUANTITY of time as well as QUALITY time with our children.

2. Until encouragement becomes a HABIT (it takes at least 21 consecutive days to form a new habit), as parents we need to remind ourselves to fill up our children’s emotional fuel tanks with accolades (praise, recognition). Sadly no one has a ‘gauge’ to let us know when that tank is full or empty so keep filling it!!!

Seize ever opportunity you can to fill that tank. But how can we give strength and encourage our kids?

1. Be specific – children (and others) recognize our sincerity when we use specific details to describe the qualities we appreciate about them.
2. Be prepared – It may seem insincere to you, but prepare positive comments in advance, especially when we know we will be attending events.
3. Be creative – try to use a variety of ways to express affirmation and encouragement, such as a note on their pillow or in their lunchbox, send them an email or even a card or note through the mail (yes the snail mail).
4. Be resourceful – Share scripture versus, meaningful quotes or picture.

What ways do you fill your child or children's emotional fuel tank or erase those negative comments? Have you reference any materials (books, videos, seminars, etc)? Any tips your willing to share?

Thursday, March 19, 2015

Positive moms

What expectations do you have for yourself as a mother?


Do you want a spotless house? (Yes please!)
Perfectly mannered kids? (Definitely!)
A long list of accomplishments? (Wouldn’t hurt!)
To be known as a ‘supermom’ (Ummm yeah, why not!)
Or better yet the ‘perfect’ mom! (Now we are talking!!!)

If you are like me you may have a picture in your mind of what a mom ought to be! But is our picture realistic? Or just a glorified status of what society or what we think we should be?

What if we were just positive?

A positive mom realizes that neither circumstances nor people are perfect. She is realistic in her expectations, recognizing that her spouse and children have weaknesses as well as strengths. And most important, she humbly acknowledges that she has a fair amount of flaws too (DANGIT!)

As moms, we bring a variety of strengths, weaknesses, talents, and faults and that unique (and individual) combination not only makes us who we are, but helps us build a loving and balanced home!

So why are we tempted to compare ourselves to other women? Other moms, working moms, stay at home moms, moms to furry kids, women without kids? Is our objective as a woman to be known as the one who has accomplished the most? To win the race? To get ahead? Don’t you think that one of the greatest gifts we can give ourselves is to stop comparing ourselves to others and live our lives for ourselves and our families?
Sadly this is where I am currently struggling. I don’t know why because I don’t recall ever comparing myself to others. In the past I haven’t cared what people thought of me nor have I compared what I believed my success in life was to others, but now I do? (What??? WHY???)

Some would say I have too high of expectations, set unrealistic goals, am too hard on myself, others say I am who and where I need to be right now. So here is my new goal, I am going to live in the moment and attempt, yes attempt because it isn’t a habit yet, to be and find the positive in my situations especially when I find myself having doubt, comparing myself to others, when my house isn’t as clean as I want it to be, and when it appears things aren’t falling into place when I think they should.

Today, I live in the quite, joyous expectation of good. ~Ernest Holmes

Saturday, February 21, 2015

Banana Oat Muffins

Ingredients:

1 cup vanilla yogurt (I use Greek)
1/2 cup fat-free skim milk
1/2 cup uncooked quick oats
1/2 tsp. vanilla
1 large egg, beaten
1 large banana, mashed
1/4 cup unpacked brown sugar
1 1/4 cup all-purpose flour
1/2 tsp. baking soda
2 tsp. baking powder
1/2 tsp. salt
1/2 cup mini chocolate chips (optional)

Directions:

Preheat oven to 375
Combine:
Yogurt, milk, oats, vanilla, and egg.
Set aside for about 5 minutes to allow oats to soften.
Add:
Banana
In separate bowl combine:
Brown sugar, flour, baking soda, baking powder and salt.
Stir flour mixture into yogurt mixture, do not beat or over mix.
Add:
Mini chocolate chips
Spoon batter into 3 mini-muffin tins coated with cooking spray.
Bake until golden brown: Mini muffins 15-18 minutes; Regular muffins 25-30 minutes.
Makes 12 regular size muffins